
Introduction
Following the company branding in the professional world has always been a headache, coming in the way of speed an efficiency when it comes to creating business documents.
While every organization has invested time, money and effort into creating its own PowerPoint template for branded presentations, Excel is almost always a strange branding blind spot!
By default, Excel is set to come with the Microsoft colors and fonts, instead of one's company style.
Consequently, whenever an Excel user creates a chart, a table or any kind of Excel content, the content comes up out of brand. Some may try to manually apply their company colors on charts, but that's a lot of work for a big spreadsheet. Some may just ignore the issue and keep the Microsoft default colors.
But in fact, there are solutions to get your brand into Excel, helping you create better spreadsheets, without having to manually change the colors and font for every object.
In this article we'll cover how to customize Excel's defaults to match your brand, so that your files always look impeccable and professional.
Understanding Excel's default page layout
The problems of not customizing Excel styles
Not customizing your default Excel styles can lead to multiple difficulties:
❌Branding inconsistency: If your Excel content use Microsoft's default colors, they won't align with your company's corporate identity and will look like content made by every other Excel users out there.
❌Waste of time: if styles aren't customized in Excel, you risk having to manually reformat each chart and table in Excel manually, virtually doubling the work for nothing.
❌Compatibility issues with PowerPoint: When you copy an Excel chart into a PowerPoint presentation, it takes the colors of the presentation, creating possible issues you have to fix, for instance if the new font color doesn't contratst well with the underlying fill color, or if the new font makes your labels look bad or too big.
❌Use of static images: To avoid compatibility problems, many users paste Excel charts as images in their presentations. This can be frustrating for anyone who have to edit the presentation later and don't have the Excel file. It also results in a lesser quality, and the inability to adjust the chart size without distoring the picture.
❌Lack of customization: If you work for an external client, they will definitely appreciate it a lot that the content you create for them matches their brand. Don't miss that opportunity to stand out!
What are the default themes in Excel?
By default, Excel offers themes in Microsoft's colors. These themes are handy, but they don't always reflect your company's visual identity, which makes your document appear less professional.
Here are the default Colors and Fonts within Excel.
So, if you insert a graph, it will automatically take the default colors and fonts of the Excel spreadsheet you are working in. As shown with the picture below:

Where can we modify Excel's page layout?
Page layout is an Excel feature that lets you control the appearance of your spreadsheets. This is where you can adjust margins, page orientation, add headers and footers, manage the themes, change the default colors, the default fonts, and much more. Basically, this is where you can give your document a professional look before printing or sharing it. Here is what it looks like:

Even though there are dozens of options to customize your spreadsheets, some of these are more crucial than others. Such as:
Themes ➡️ choose from a variety of predefined themes that modify the colors, fonts and effects of your document.
Colors ➡️ Select specific color palettes for your charts and tables.
Fonts ➡️ Change default fonts to match your brand.
How to customize the default Excel styles via a theme
Method 1: changing colors and fonts by hand.
The most direct and laborious method of customizing Excel styles without any tools is to change colors and fonts manually. This means retrieving the exact color code from your graphic chart -often from PowerPoint- then adjusting each element in Excel to match.
NB: If you're not familiar with the notion of color themes in PowerPoint, we suggest you read our article 👉How a smart use of color themes can save you hours on Powerpoint.
Step 1: find the codes correlated to your company's color theme.
Let's take an example starting from PowerPoint. Here, we want to find the code of the 6 colors starting from the right.

What you have to do is to retrieve the Hex of the 6 theme colors in the Slide Master of the appropriate PowerPoint document.
To do this, go to the View tab, choose the Slide Master feature and click on Colors. You will then see this pop up window appear:

Go to Customize Colors...

Click on More Colors...
Copy the Hex code!
Step 2: take the Hex colors and import it within Excel.
Once you've got all the Hex colors of your company's color themes, you will be able to use the exact same colors in Excel.
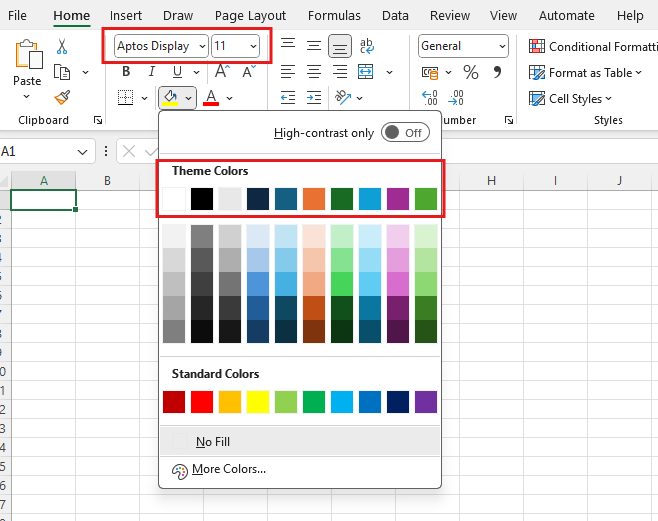
What you need to do is to go into the "Page Layout" tab and click on the "Colors" feature. Then, go to "Customize Colors..."
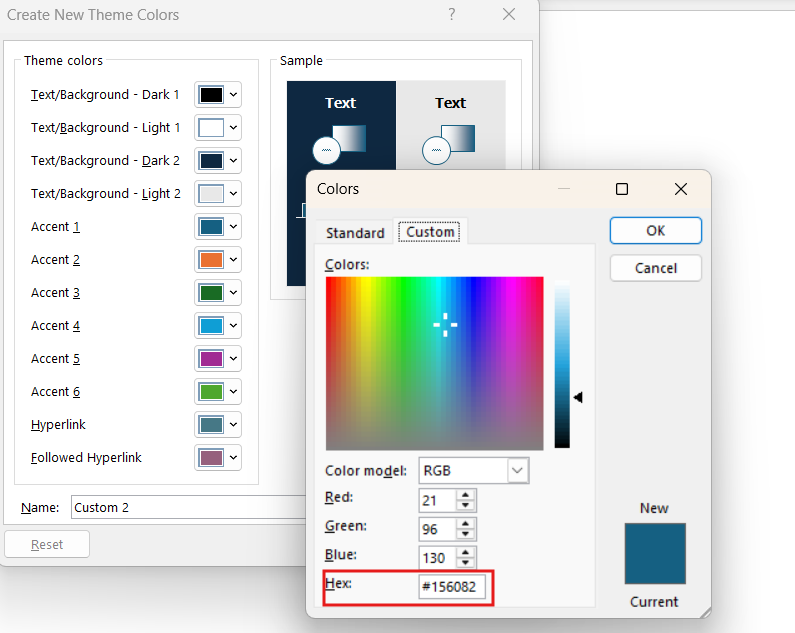
This pop up window will appear and you will be able to see the 6 Accent colors.

Click on the first Accent color and go all below to the "More Colors" section. The same pop up window will appear (the one seen In PowerPoint with all the details regarding your current color) and you will be able to paste the Hex Color that you previously found and copied in PowerPoint.

Repeat the same steps for the 5 other colors and don't forget to save.
After that, you will be able to find your customized color themes in the "Colors" feature of the "Page Layout" tab:
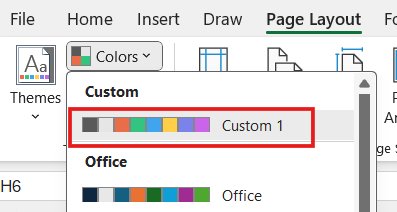
Needless to say you may want to give your custom theme a clear name, so you can immediately identify it later!
Step 3: change the theme fonts for heading and body
Similarly go to the "Fonts" menu and choose "Customize Fonts". You will need to set up a font for Headings and one for Body.

✅ With these steps you can customize your Excel spreadsheet to your company branding.
On the other hand, it's:
❌ Time-consuming and prone to errors.
❌ It needs to be repeated for every file created, and nobody want that.
❌ Prone to inconsistencies inside the same organization, if people apply the colors differently or not in the same order.
Method 2: save and load the theme from PowerPoint, all at once.
A faster solution is to create and save a custom theme file (.thmx) from PowerPoint, where your colors and fonts are saved all at once. This file can then be imported into Excel to standardize the appearance of tables, charts, cell styles etc. in one shot.
Of course, for this to work you need to already have a clean theme in PowerPoint!
👉 If you're not sure about this, check this article: Unlock productivity with the Slide Master in PowerPoint.
Step 1: Save your current theme from the Slide Master tab in PowerPoint
From PowerPoint, go to "Slide Master" (View tab) and then select "Themes".
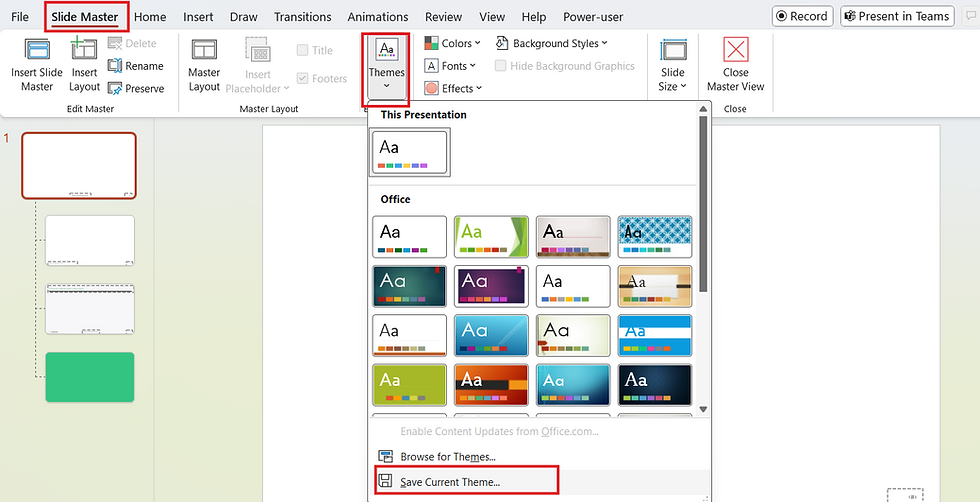
Click on "Save Current Theme..." and save it in an appropriate folder and appropriate format (.thmx). You can also go to "File\Save As" and choose the .thmx file type.
Step 2: Import your thmx file into Excel
From Excel, go to the "Page Layout" Tab, select the "Themes" feature and click on "Browse for Themes...".
Select the .thmx file saved earlier, and the theme colors and fonts will automatically adjust, matching the ones you have in PowerPoint.
✅This approach is definitely faster than the first, and all it takes is to have a PowerPoint theme to save first.
❌However the loaded theme will still only be applied to the current Excel file. You'll still need to repeat the process for each new spreadsheet you create.
❌It also still requires every user in the same organization to do the same, which they won't have the discipline or knowledge to do.
Method 3 Set a default theme in Excel.
So, how do we avoid repeating the same operations over and over again? The answer is to have your custom theme as the default theme applied in Excel, so that you don't have to even think about it anymore.
This requires saving an Excel template file (*.xltx) with your theme, and placing it in a specific folder on the computer, that Excel uses for new files you create. This way, each new Excel file will automatically open with your company's colors and fonts.
Step 1: Save your Excel template file under the appropriate format
Simply go to the "File" tab, click on "Save", enter an appropriate file name and choose "Excel Template (*.xltx)"
Step 2: Save your Excel template file in the appropriate folder
Next we need to tell Excel to use that template by default when creating a new spreadsheet. For this, you'll need to save the file in the XLSTART folder. This folder is usually located here: C:\Users<username>\AppData\Roaming\Microsoft\Excel\XLSTART
Note that the folder location may depend on your Excel version and computer settings. You can find here the usual suspects for the XLSTART folder.
✅ Now whenever you start Excel, the new default will be your custom template. No need to think about the theme anymore, it will always be here already. That's definitely better than the 2 previous methods.
❌However everyone in the company needs to follow these instructions individually to ensure visual consistency across the organization. Let's face it, they won't.
❌ Also, the day you get a new computer, you will have to repeat the same steps again.
These three options above are useful, but they remain limited in terms of practicality and company-wide consistency. Fortunately, there's an even more effective solution.
Define and apply a default Excel theme for your entire organization at once with Power-user
How it works
Power-user is a productivity add-in for PowerPoint, Excel and Word with dozens of powerful features to create professional documents more efficiently. makes customizing Excel styles as simple as it gets.
Among them, Power-user can automatically deploy one - or several - Excel templates for groups of users in the organization. You can push and centrally update the company theme with basically just 1 click, so that individual users don't even need to know about any of this or to take individual action.
Best of all, Power-user doesn't limit itself to colors and fonts. You can also include:
Common cell styles and format tailored to your needs (for instance, having the same formats available to the entire organization for k€, m€, $k, $m, bps, etc.)
Common styles for tables, adjusting the colors, borders etc. for header rows and columns, totals, etc. in order to follow common visual guidelines (and save time!).
Add custom content by default to every Excel file created, such as a title, a legal disclaimer, a table of content worksheet, chart examples to copy, etc.
Here is an example of cell styles defined centrally, allowing everyone to create consistently-looking spreadsheets across the entire organization:

👉 Read more about document templates management (not just Excel, but also PowerPoint and Word)
Key benefits of setting up an Excel theme with Power-user
✅Branded Excel files: Get spreadsheets to match your company guidelines, instead of haing the same colors and fonts as every other user in the entire world.
✅Seamless integration with PowerPoint and Word: Content pasted from Excel into PowerPoint or Word will match the colors and fonts of the destination file, ensuring a consistent design across all documents.
✅Save huge amounts of time: applying your theme colors manually on each chart or table created is a considerable waste of time for many people in your organization. You will immediately get all this time back by having your theme as the new default.
Conclusion
Customizing styles in Excel is essential for producing professional documents that reflect your corporate identity. While manual options and saved themes offer a first solution, they remain limited in terms of practicality and collaboration.
With Power-user, you can go much further, customizing not only Excel, but also the other tools in the Office suite, while ensuring graphic uniformity throughout your company. All in just a few minutes!
So, are you ready to stop reformatting every object manually? Contact us 👉 here 👈